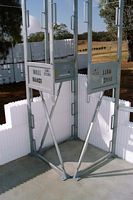
Wall Brace Scaffold Trestle Installation and Awareness Guide
The Wall Brace Scaffold Trestle is a patented wall alignment system. It is an integral part of the installation of the ZEGO wall system
Wall Brace Scaffold Trestles are positioned
- In the corners
- 100mm either side of door and window openings
- and at no more than 1800mm centre to centre ( as this is the legal span for scaffold planks )
- Adjusted plumb
- Tie wall to Wall Brace Scaffold Trestle every 2 courses
Bolt each Trestle brace to the concrete slab or footing using bolts supplied by Wall Brace Australia pty Limited
- 4 x bolts per brace
- Correct drill bit 8mm
- Minimum embedment 40mm into good slab or footing
- Do not over tighten bolts
- Each bolt 40mm embedment has a working stress design of 3.5kN ( 350kg ) in 15MPa concrete with a limit state design of 6.3kN ( 630kg ). 4.7kN in 32MPa concrete and 5.2kN in 40MPa concrete
- IE a pair of bolts with load applied laterally at 2m high has a leverage with base plate pivot point to centre line of bolt of 105mm = 19.0476. Therefore a limit load of 12.6kN or 1.26 Tonne divided by 19.0476 = 0.6615kN or 66.15kg at 1m above ground 1.323kN or 132.3kg in 15MPA concrete and this loading increases as the concrete continues to cure.
- A handrail test is to 100kg and this would be the most likely impact on a trestle
- NOTE: A standard free standing Trestle frame only requires 30-35kg of horizontal loading to overturn and both require much more if vertically loaded
- NOTE: Never leave unbolted scaffold frames free standing.
- Always lay down horizontal when not in use.
Concrete strength during the curing process of the slab and footings
- 15 MPa initial minimum strength when the scaffolding is used as a platform
- Concrete strength after placement will be 40% at 3 days
- 50% at 4 days
- 60% at 7 days
- 80% at 14 days
- 100% at 28 days
- NOTE: The % is of the ordered MPa concrete strength
- Higher strength concrete may be used to gain high early strength if required ( pleas confirm with your project engineer )
Planks
- Minimum 2 x scaffold plank wide
- Planks must be in good condition ( no splits, cracks, knots, bents etc )
- Overhang of plank on Scaffold Trestle between 150-250mm
- Overlap planks over Scaffold Trestle
- Maximum deflection of scaffold plank 25mm
Handrails
- Install 100 x 50 timber handrail
- Lap only over scaffold handrail posts
- Handrail must be in good condition ( no splits, cracks, knots, bents etc )
- NOTE: Hand rail can be installed as Top Plate as scaffolding is dismantled
Access ladder
- Install ladder access and secure to scaffold plank with two ( 2 ) 50mm roofing screws
Dismantling of Scaffolding
- Remove in reverse to above
- Leave one tie to wall
- Unbolt all floor bolts
- Remove last tie and carry one person each end to steel stillage and stack end to end
- Twenty five ( 25 ) per stillage with ladder on top
- Stack stillage in area assessable by crane truck to avoid double handing.
- Clear walkway of trip hazards
- NOTE: Never leave unbolted scaffold trestles free standing. Always lay down horizontal when not in use.
Additional NOTES
- Prevent inadvertent impact by persons and plant - eg by using "NO-GO Zones" and or dedicated clear travel paths
- Protect starter bars with protective caps
- Monitor weather conditions. Do not access work platform in high wind conditions
- Maximum 225kg per scaffold bay
- Control the movements of multiple persons, eg do not walk around others on 2-plank platforms
- Under no circumstances should anyone climb the brace trestles or frames
- Handrails must be installed if potential fall exceeds 2m eg beside lift shafts, stairwells, balconies, floor penetrations etc
- When drilling or bolting wear PPE eg earmuffs, glasses or goggles and no loose clothing or hair
- Look up and stay clear of power cables
- When using power cables hang safely on cable hangers on brace trestle to keep walkways clear
- Do not run on platform
- Inspect scaffold and platform prior to accessing each time to ensure planks and handrails are lapped safely and all bolts are installed into feet of the scaffold brace
- Always assess risk on your particular project.
Risk Management and Consultation
Before working on frame trestles, follow the risk management process.
The process does not need to be complicated. In most cases you can simply:
- Look for hazards
- Decide who might be harmed and how - ie Is there a risk?
- If a risk exists, consider ways of doing the task more safely.
- Take action to eliminate the risk; or if it is not reasonably practicable to do so, then to control the risk.
Your workers' experience and knowledge can help you identify and control hazards.
Therefore, you need to consult with them directly.
Plumb up the face of the brace by turning the adjustor at the rear of the Wall Brace Scaffold Trestle
Once the wall is built and before foaming off and concreting, pull a string line along the face of the wall elevation and fine tune the Wall Brace Scaffold Trestle as required.
Click here for correlation between labour cost vs Wall Brace Scaffold Trestle rental cost


